Thursday, April 28, 2011

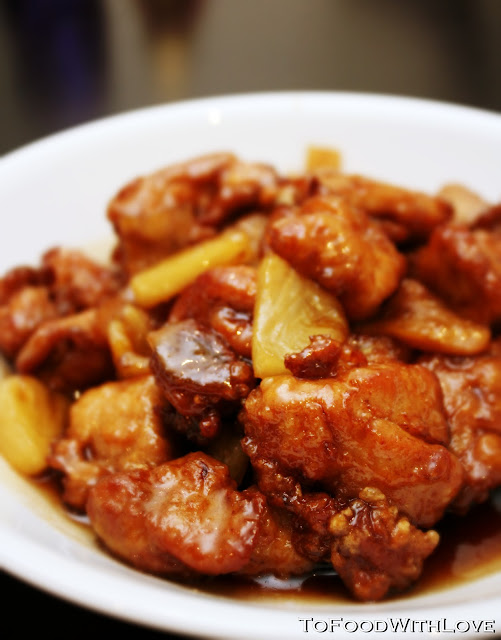
Chicken with Black Vinegar and Pineapple Sauce


There was some pineapple that was left over from the other day when I made sweet and sour pork, so I decided to use it and make a sweet and sticky black vinegar caramel sauce, made using a reduction of vinegar with sugar and water, and simmered with pineapple and ginger. This goes really well with the deep-fried chicken, and so here is the recipe below.


Chicken with Pineapples in Sweet Black Vinegar Sauce

Ingredients

500g chicken thigh fillet, cubed
1 inch ginger, shredded
1/2 cup fresh pineapple pieces

Marinade:
1 inch ginger, grated
3 cloves garlic, chopped
2 tbsp light soy sauce
1 tbsp sugar
1 egg
1 tbsp cornflour
1 1/2 tbsp plain flour

Sauce:
3 tbsp Chinkiang black vinegar (or to taste)
4-5 tbsp sugar
2/3 cup water
1 tbsp maltose

Method:

  1. Combine chicken with marinade and leave for a few hours. Deep fry until golden brown and cooked. Drain and put aside.
  2. Heat up 1 tbsp oil in a wok, then fry the shredded ginger until fragrant. Add the sauce ingredients and pineapple pieces and bring to boil, stirring until it reduces and starts to turn into a syrupy consistency. Add the chicken to the sauce and stir to coat evenly for 1-2 minutes. Dish out and serve with steamed jasmine rice.

Neopolitan Steamed Marie Cake


If you can't bake it, then steam it! Steamed cakes are easy to make, and this one here is made using Marie biscuits, eggs, butter and brown sugar. I decided to make a Neopolitan version, layered with chocolate, strawberry and vanilla flavours. The use of brown sugar makes this cake not-too-sweet, with a delicate buttery taste and hint of vanilla that makes you want to eat more. I also added some prunes to the cake as Z loves them (he eats prunes like they were candy).

So if you're one of those who are daunted by the idea of baking cakes, try steaming one instead. They are foolproof and just as delicious!

Neopolitan Steamed Marie Cake

Ingredients

200g butter
150g brown sugar
1/2 tsp vanilla extract
4 eggs
250g packet Marie biscuits (or other similar plain biscuits), finely ground

Flavourings:
1 tbsp cocoa powder + 2 tbsp hot water, mixed
1 tsp strawberry paste (or you can use strawberry essence + pink food colouring)

Method

  1. Grease and line a 20cm square tin with baking paper. Prepare a steamer or wok for steaming.
  2. Cream butter and sugar with vanilla extract until light and creamy. Then add eggs one at a time and beat/whisk until fluffy and well combined. Add the finely ground biscuits and stir until evenly mixed.
  3. Divide batter into three portions and add cocoa mixture and strawberry paste to 2 of the portions.
  4. Spread one layer of batter in the tin and steam for 10 minutes. Repeat with the other 2 layers and steam for 10 minutes each. Cool the cake before cutting into pieces.

Wednesday, April 27, 2011

Indian-style Rojak

Prawn fritters, deep-fried bean curd and cucumber pieces, served with a
peanut-tamarind-sweet potato gravy

Tuesday, April 26, 2011

Sweet and Sour Pork


A simple sweet and sour pork dish with red peppers, onions, fresh pineapple and tomatoes. The pork (which is first tenderised with a meat mallet) is marinated with salt, pepper, chinese cooking wine, sesame oil, sugar, egg and cornflour, then dusted in more cornflour before deep-frying. The sauce is basically just tomato sauce, plum sauce, chilli sauce, white vinegar, sugar, salt, pepper and a dash of chicken stock powder.

The only thing that was wrong with this dish was that I purchased the pork from the local supermarket, which I usually never do except in desperate times. The prepackaged pork from there, as opposed to the one from the Asian butcher, has a strong "porky" taste which I'm not used to. Not sure why this is the case, but bear this in mind when buying pork next time :)


Sunday, April 24, 2011

Lemon, Passionfruit and Coconut Chiffon Cake


Lemon, Passionfruit and Coconut Chiffon Recipe

Ingredients

5 egg whites
80g caster sugar
1/2 tsp cream of tartar
Pinch of salt
5 egg yolks
1 tsp grated lemon rind
70g caster sugar
1/2 tsp vanilla extract
100ml Ayam Brand coconut cream
60ml corn/canola oil
45ml lemon juice (from half a large lemon)
40ml canned passionfruit pulp in syrup
150g self-raising flour, sifted

Method

Preheat oven to 170C.

Whisk egg whites until frothy, then add sugar, cream of tartar and salt and whisk on high speed until just stiff.

In another bowl, whisk egg yolks, sugar, vanilla extract and rind until light and creamy. Add coconut cream, oil, lemon juice and passionfruit and whisk until well combined. Sift in the flour a little at a time and fold in gently with a spatula until smooth and well combined.

Take 1/3 of the egg white and fold it into the egg yolk mixture. Then pour this into the rest of the egg white mixture and gently fold through until evenly combined.

Pour the batter into an ungreased 22cm tube pan and bake in oven for 40-50 minutes or until light brown and firm to the touch. Remove cake from oven and immediately invert the pan onto a cooling rack. Leave to cool completely and remove the cake with a thin bladed knife.

Notes & tips:

  1. Use large eggs to give maximum volume to the cake. Make sure the eggs are at room temperature (and so should the other ingredients).
  2. Egg whites should be beaten until just stiff. Peaks should hold and not flop to the side when whisk is lifted.
  3. I added the passionfruit seeds as I find they give a nice burst of flavour when bitten into. But omit them if you wish. I haven't used fresh passionfruit in this recipe before, but they would be more sour than the canned ones.
  4. To fold in the flour, sieve the flour onto the egg yolk mixture a little at a time and gently fold it in with a spatula. Adding too much flour at a time may cause lumps in the mixture, unless you're using a big/wide bowl with a large surface area.
  5. When folding the egg yolk and egg white mixture together at the end, do this gently but make sure you scrape the bottom of the bowl for any egg white that has not been mixed through.
  6. Undercooking the cake may cause it too be too moist and slip out of the pan when inverted. Use a wooden skewer to check that the middle (near the centre tube of the tin) of the cake is cooked and not wet or sticky.
  7. After baking for about 30 minutes, if the top starts to brown too much, cover the top with a piece of baking paper and continue to bake until cooked. This will also reduce likelihood of the cake cracking on top.
  8. Cool the cake on a cooling rack to allow air to circulate better.
  9. A disposable plastic knife is handy in removing the cake from the tin as it has a flexible blade. It is also less likely to scratch the surface of the tin.
  10. The cake is best eaten within 1-2 days.
The black speck you see here is a passionfruit seed.....

Saturday, April 23, 2011

Hainanese Chicken Rice


Slow-poached chicken drizzled with a soy and sesame oil dressing and garnished with coriander leaves

There are plenty of recipes for Hainanese chicken rice out there, so I decided not to post it here. If you've never attempted making it before, well, don't be daunted by it. It's actually pretty simple. I will summarize it here:

Chicken:
  • We usually use organic or chemical free chicken as they seem to have a better texture and taste to it. If you don't want to use a whole chicken, you can just use chicken marylands (thigh and legs) if you prefer. But cooked properly, chicken breast meat is actually really tender and flavourful as well. So it's up to you.
  • Rinse and dry the chicken, then rub it all over (inside and out) with salt. Then, place some garlic, ginger and scallions into the cavity. Oh, and before you do that, remove the excess fat from the chicken, which you will find near the thigh area. You need this for cooking the rice and making the chilli sauce.
  • Bring some canned chicken broth (I usually use Swansons and Campbell's chicken stock to add more flavour to the chicken) and water (ratio of about 1:3) to a boil in a large pot. Add a few white peppercorns if you like. Boil the chicken for 20 minutes, ensuring it's submerged. Then turn off the heat and cover with a lid. Let it stand for another 20 minutes. Prepare a large bowl of iced water. Remove the chicken from the pot immediately and submerge it in the ice bath, making sure it's cold at all times. Leave it for 20 minutes, then remove it immediately. The skin and fat should have gelatinized by then. Don't leave it too long, otherwise the chicken will be too cold and tough. Rub some sesame oil and soy sauce over the chicken before chopping into pieces (or you can debone it if you wish).
  • Garnish with scallions and/or coriander, and drizzle a mixture of soy, sesame oil and sugar for the sauce.

Rice:
  • Fry the chicken fat until all the oil is extracted. Reserve some for chilli sauce. To the remaining fat in the pan, add the raw rice (washed) together with ginger, garlic and pandanus/screwpine leaves. Season with salt. Place everything in rice cooker and add chicken broth from earlier and cook as usual.
Chilli:
  • The chilli is just a mixture fresh red chillies blended/pounded with plenty of ginger, some garlic, lime juice, rice vinegar, chicken fat and chicken broth, seasoned with salt and sugar. Pounding it with a mortar and pestle yields a better result as it extracts the "juices" from the chillies.
Thick soy drizzling sauce:
  • You can serve the rice and chicken with a drizzling of thick soy sauce which you can make by combining thick caramel (thick dark soy) with sugar and a little sesame oil.
To serve:
  • Serve the chicken on a large plate with some sliced cucumbers. Dish out the chicken rice onto individual serving plates. Have your condiments ready,  ie. chilli and soy drizzling sauce, and little bowls of soup using the chicken broth used for poaching the chicken (you probably need to dilute the soup as it might be quite concentrated). Season the broth/soup with salt. Sprinkle chopped scallions in the soup before serving.
Gee....so much for summarizing! Now you've got the basics, go ahead and make some Hainanese chicken rice. The proof is in the poaching!


Thursday, April 21, 2011

Sayur Lodeh (Vegetable Curry)

String beans, carrots, cabbage, deep-fried tofu and glass noodles in a
lightly spiced coconut gravy with lemongrass, coriander and turmeric.

Sayur Lodeh (Vegetable Curry)

Ingredients

3 cups cabbage, cut into 2-inch pieces
1 cup brinjals/eggplant, halved lengthwise and sliced diagonally into 1 1/2 inch lengths
1 cup  long green beans, cut into 2 inch lengths
1 cup carrots, cut into 1/4 inch thick matchsticks
1 cup turnips, cut into 1/4 inch thick matchsticks
4-5 pieces deep-fried tofu, halved
1 small bundle of glass noodles, soaked in water until softened (optional)
1/4 cup vegetable oil
3 tbsp ground chilli paste (or substitute with chilli powder)
2 stalks lemongrass, white part only, bruised/smashed
1 inch ginger, sliced
2 tbsp dried anchovies, washed and drained
4 cups water
2 cups coconut milk
1-2 tsp salt, to taste
1 tsp sugar, to taste
1 tbsp grated palm sugar (the yellow type)
1/2 tsp ikan bilis stock powder (optional)

Blend into a paste:
2 medium onions
4 cloves garlic
1 1/2 tsp belacan (dried shrimp paste)
2 tbsp dried shrimp, washed and drained, and left to soften
1/2 tsp turmeric powder
1 tsp ground coriander

Method

Heat up vegetable oil in a pot. Fry the ginger and blended ingredients for 2 minutes, then add chilli paste and fry until the oil separates. Add the dried anchovies and lemongrass and fry briefly. Then add water and bring to a boil. Simmer for 20 minutes. Add coconut milk and bring to a simmer again. Add salt and sugar to taste, and ikan bilis stock powder to enhance the flavour, if desired. Then add tofu and vegetables and cook on a gentle simmer until just tender (about 10-15 minutes) on low-medium heat. Add glass noodles last and cook for about 30 seconds. Dish out and serve immediately with steamed rice, as the glass noodles will tend to soak up the curry if left for too long.

Cheesy Baked Tomato Rice

Quick, easy and delicious using canned tomato soup. Love the crisp edges of the baked rice.

To make this, prepare a simple fried rice with a little garlic, soy, eggs, chicken, bacon, tomatoes, capsicum, peas, corn and mushrooms (or whatever else you like). Spread it out in a baking dish and preheat the oven to 200C. Prepare the topping next by making a roux. Heat up a pan and melt 2 tbsp butter. Stir in 2 tbsp flour and cook it for about 2 minutes until it starts to bubble. Stir in one can of Campbell's condensed tomato soup and mix well, and bring to a boil. You may season it with a little pepper, salt and sugar if desired. I also added some chopped parsley. Pour the mixture over the top of the rice, and top that with grated cheese (cheddar/parmesan/mozzarella etc). Bake in the oven for 15 minutes or until cheese starts to brown. Remove from oven and serve hot. I used parmesan and mozzarella which gives it a nice chewy gooey texture.

Tuesday, April 19, 2011

Mum's Mee Rebus


My mum makes the most delicious mee rebus and my sister managed to get hold of the recipe. So I decided to try making this on Z's birthday as we invited the relatives over for lunch. I don't think I've ever cooked so much before in my life! It was enough for at least 20 servings, and by the time I finished the food preparations the day before (chopping, peeling, mashing, frying the paste), I could feel a dull ache creeping up my back. I could really do with a good long back massage.

On the morning of the lunch party, I just had to boil the beef and combine the ingredients to make the gravy. Sounded easy. However, as it was my first time making it, plus I haven't had mee rebus in a long long time, I couldn't quite remember how it should taste exactly, and when I tasted the gravy, it was rather insipid and had a strange aftertaste. That was when I started panicking and wondered if I should order pizza instead and ditch the mee rebus.

Thank goodness my sister came to the rescue (although she was an hour later than expected)! She had made this dish not too long ago, so she would be able to tell me (objectively) what was wrong with it. Basically I think I needed to add more spice, chillies and shallots, which I quickly fried up and added to the massive pot of gravy. After letting it boil down for another half hour or so, it all started to come together with the right taste and consistency. Phew! After I sat down to have a bowl of it (with all the garnishings, condiments etc), I was happy that it turned out even better than I expected (okay, I didn't want to have high hopes for a first attempt).

My sister gasped when I told her that it was also my first time trying out the cucur udang recipe. I know, I shouldn't be trying out new stuff when cooking for guests, but I find that first attempts usually work out for me (or perhaps it's because I don't have a benchmark). It's when I try to replicate a previous successful attempt that it sometimes doesn't turn out as well as I hoped. Anyway, the fritters turned out fantastic, and I think it must have been pretty popular with everyone as there weren't many left when it was my turn to eat. Click here for the recipe. It goes really well when soaked in the mee rebus gravy.

After everyone had finished eating, there was still a tonne of gravy left in the pot, and so I packed some in takeaway boxes for the guests to bring home. It will be a while before I make this dish again as we've been eating it three times in a row, and I still have a container of it in the freezer. But now that I've attempted making it, mee rebus is no longer a mystery to me!

Alright now, let's see.....where did I put that recipe..... scroll down and have a look!


Mum's Mee Rebus Recipe

Ingredients

Prepare beef stock:
500-600g beef (kept whole)
6-7 cups water
Salt
Pepper
1 cinnamon stick
6 cloves
 
Boil the beef for 2 hours until tender. Remove beef from stock and slice thinly into bite-size pieces.
 
Prepare mashed potatoes:
1/2 kg sweet potatoes, steamed/boiled and mashed.
 
Blended ingredients:
1 cup shallots, ground
4-5 tbsp chilli paste (dried chillies soaked and finely blended)
2-3 tbsp ground coriander
2 inches galangal, finely chopped
6 candlenuts, finely ground
1 1/2 tbsp salted soy bean paste (Yeo's brand)
 
Thickening solution:
1 tbsp corn flour + 1 tbsp rice flour mixed with 1/4 cup water
 
Assembly:
1.5 kg yellow hokkien noodles, blanched
200g bean sprouts, blanched
Deep fried tofu, cut into cubes
Boiled potatoes, sliced
Hard boiled eggs, sliced
Crispy fried shallots
Coriander and scallions, chopped
Lime/lemon wedges
 
Method:
 
1. Fry the blended ingredients in vegetable oil until fragrant. Add beef stock and bring to a boil. Simmer for 1/2 hour. Add mashed sweet potato gradually until it's thickened into a gravy. Do this by mixing a little mashed sweet potato with some stock in a ladle to loosen up the potato before stirring it into the rest of the stock in the pot. Make sure it's fine and smooth. You don't want chunks of sweet potato in the gravy. Simmer for 15 minutes, stirring occasionally.
 
2. Stir in the thickening solution and bring to a boil again.
 
3. Add the sliced beef.
 
4. In individual serving bowls, assemble noodles, bean sprouts, tofu, potatoes and boiled egg. Ladle some of the gravy and beef into each bowl. Garnish with fried shallots, coriander and scallions. Squeeze some lime/lemon juice over before serving. Serve with cucur udang if desired (highly recommended).


Monday, April 18, 2011

Car Birthday Cake - A Herbie Wannabe


We celebrated z's birthday yesterday with a car-shaped cake (he wanted a Herbie - Beetle) made with a melt-in-your-mouth dark chocolate mudcake covered in a chocolate-sour-cream ganache. I decorated the car with lollies, smarties, M&M's, icing flowers, oreos and silver cachous for some bling!

I made a round 9-inch mudcake, trimmed off the sides to make a rectangle, and then used the curved sides of the cake for the roof. The oreos worked well for the tyres, with retro-looking hubcaps which I thought was quite cool. The cachous added a wonderful diamond-studded effect to the car, perhaps making it a litle mafia-looking. LOL.


For the windscreen and windows, I melted some white chocolate and sprinkled some cachous over it before letting it set, and then cut them out into the desired shapes. I also made the cake board using H's puzzle board which I found was quite sturdy, and then covered it with some foil wrapping paper.

Considering this was my first time carving and decorating a cake, I was pretty happy with how it turned out. z was happy with it too, and he went straight for the piece with all the blue M&M's! :)

Sunday, April 10, 2011

Blueberry Yoghurt Cake

A moist and tender cake made with strawberry yoghurt and topped with plenty of blueberries

I made this cake yesterday at the spur of the moment, seeing that I had blueberries and the last tub of strawberry yoghurt (which was actually H's, and she looked horrified when she saw me pouring it into the mixing bowl) in the fridge. This is an easy recipe to follow and takes about 15 minutes to prepare. Quick and easy to satisfy my sweet cravings! :)

Blueberry Cake Recipe

Ingredients

  • Melted butter, to grease
  • 150g butter, cubed
  • 155g (3/4 cup) caster sugar
  • 2 eggs
  • 265g (13/4 cups) self-raising flour
  • 1 x 200g carton fat-reduced strawberry yoghurt (Attiki brand)
  • 1 x 150g punnet blueberries
  • Icing sugar, to dust

Method
  1. Preheat oven to 180°C. Brush a square 19cm (base measurement) cake pan with melted butter to lightly grease. Line the base and sides with non-stick baking paper.
  2. Use an electric beater to beat the butter and sugar together in a large bowl until pale and creamy. Add the eggs, 1 at a time, beating well after each addition until combined.
  3. Stir in half the flour and yoghurt until just combined. Stir in the remaining flour and yoghurt until combined. Spoon into the prepared pan and smooth the surface. Scatter the blueberries evenly over the top. Bake in preheated oven for 40 minutes or until a skewer inserted into the centre comes out clean. Remove from oven and set aside in the pan for 10 minutes to cool slightly.
  4. Carefully turn out onto a wire rack. Turn upright and set aside for a further 20 minutes or until cooled to room temperature. Dust with icing sugar and cut into slices to serve.
 Recipe sourced from Taste.com.au

Wednesday, April 6, 2011

Pure Lemon Tart


I decided to call this Pure Lemon Tart simply because unlike classic lemon tarts made with cream, this one doesn't use cream in the lemon filling. The result is a sweet and tangy, curdy and jammy filling that packs a punch, and combined with the tender buttery shortcrust pastry, it's a match made in heaven.

When I was little, I never had any lemon tart other than the one my mum made at home. It was my favourite dessert and I frequently begged her to make it. However, it usually depended on whether lemons were available, or whether they looked fresh, or sometimes it's because my dad prefers lemon pudding to lemon tart (which I still think is not a valid reason not to make it!).

And so, here is mum's recipe for Lemon Tart:

Pure Lemon Tart

Ingredients

Pastry:
150g cold butter, diced into cubes
1 tsp baking powder
225g plain flour
Pinch of salt (about 1/2 tsp)
1 egg yolk (cold) mixed with 1 tbsp ice-cold water
1 tsp lemon juice
A little egg white for brushing

Filling:
Juice and rind of 1 lemon
45g butter, softened
180g caster sugar
1 large egg

Method:
  1. To make the pastry: Sift flour with baking powder and add salt. Combine with butter and rub with fingertips until the mixture is crumbly. Drizzle over the egg-water mixture and lemon juice, mix and gently bring the dough together to form a ball. Take care not to overwork the dough. Cover in clingwrap and rest in fridge for 30 minutes. Roll out the pastry between 2 sheets of baking paper into a circle about 3mm thick. Line a 9-inch / 23cm loose-bottomed tart tin with the pastry. Cut off excess pastry and crimp the edges. Fill up any holes with the excess pastry. Prick the base of the pastry all over with a fork and rest it in the fridge for 30 minutes to prevent shrinkage while baking.
  2. Preheat oven to 180C. Blind bake the pastry by lining it with baking paper and filling it with rice/beans/weights. Bake for 15 minutes, then remove the baking paper and weights, and bake for another 10-15 minutes until the base just starts to turn colour. Remove from the oven and brush the inside of the pastry with a little egg white (to seal the pastry and prevent it from getting soggy after the filling is added). Return it to the oven for 1 minute and remove from oven.
  3. While the pastry is baking, you can prepare the lemon filling (takes about 5 minutes). Cream butter and sugar, then beat in egg, rind, followed by the lemon juice. Pour into the baked tart shell and bake in oven at 180C for about 20 minutes or until the filling starts to bubble and the top caramelizes to a deep brown colour. Remove from oven and leave to cool. Remove from the tin and place on a serving dish, Cut into wedges and serve. Refrigerate any left over and warm up slightly in the microwave or oven before serving.
Note: If you're one of those who try to reduce the quantity of sugar in recipes, be reminded that if you do, the lemon filling may be too sour, unless you have super sweet lemons! And if you're tempted to add more lemon juice, try not to as there is a chance it might not set properly since there is only 1 egg used in the recipe. Plus it will also be more sour! Happy baking! :)


Fried Carrot Cake

Fried carrot cake (chai tau kuih) with bean sprouts

I couldn't resist the temptation, so I made carrot cake a few days ago. Making the cake itself is not difficult. It's made from grated daikon/radish, rice flour, water, tapioca starch and seasoned with salt, soy sauce, pepper and sesame oil. I also added a little alkaline water to improve the texture. This is steamed for about 40 minutes, and then cooled before cutting into cubes for frying.

I fried the carrot cake two ways: the white version and the black one. The black version has dark caramel soy sauce added to it, plus extra sugar for sweetness. I also used a little kecap manis as it has a sweeter flavour compared to regular dark soy sauce. No salt or soy/fish sauce is added to the dish when frying as the preserved radish (chai poh) is already salty. However, I did add a little fish sauce to the beaten egg mixture before pouring them over the carrot cake in the pan, just for a touch of seasoning.

I like my carrot cake cut up into tiny cubic pieces, covered with moist bits of egg. I don't particularly fancy chunks of egg in it, so I make sure that I mix the carrot cake around in the egg before it sets so that it coats all the pieces evenly. At this point, I also add a little of the dark soy sauce over the eggs so that they are slightly sweet and moist, before adding more sauce over everything else. To make the dish more substantial, I also tossed in a few seasoned prawns. The beansprouts are added towards the end along with the chopped spring onions. Yum yum....carrot cake is served!


Fried carrot cake with bean sprouts, shrimp and sweet black sauce

Tuesday, April 5, 2011

Broccoli Beef with Holy Basil


Here's a quick and simple beef and vegetable stir-fry that has all the protein, iron and vitamins that your kids need for a well-balanced meal (served with steamed rice of course).

Broccoli Beef with Holy Basil

Ingredients

400g beef scotch fillet, thinly sliced
2 cloves garlic, chopped
1 handful Thai / Holy basil
Broccoli florets, boiled in salted boiling water until almost tender, and refreshed with cold water
1 stalk green spring onions, cut into 4 cm lengths

Marinade:
1/2 tbsp fish sauce
1/2 tbsp oyster sauce
1 tsp sugar
Dash of pepper
1/2 tsp bicarbonate of soda
1 tbsp cornflour

Sauce:
1 tbsp oyster sauce
1 tbsp fish sauce
1 tbsp palm sugar (or substitute with brown sugar)
1/4 tsp black pepper
1/4 cup water
A few drops of sesame oil

Method

  1. Combine marinade with beef and leave aside for an hour.
  2. Heat up some oil in a wok and fry the beef until browned all over. Dish out and leave aside.
  3. Fry the garlic in a little oil in the wok, then add sauce ingredients and bring to boil. Add in the beef, spring onions and broccoli and toss until well combined and beef is cooked. Taste for seasoning. Stir through the basil, then dish out onto a plate and serve with steamed jasmine rice.
Tip: Pop the beef in the freezer for about an hour until firm before slicing. This will give you thinly shaved slices of beef that makes it easy for the little ones to chew.